DIY POP-UP CHRISTMAS CARD

Christmas Cards Banner
Pop Up Christmas Card

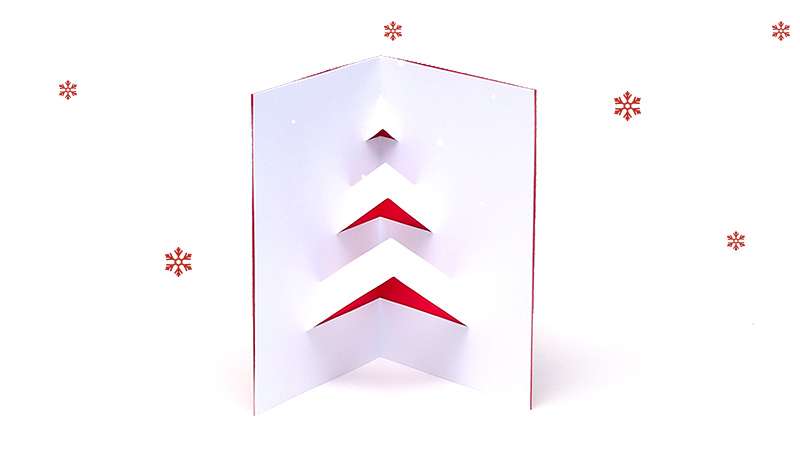
It’s the most wonderful time of the year and what better way to start the celebrations with your family than creating your very own DIY pop-up Christmas card? The perfect way to spread a little festive cheer, sending a homemade Christmas card adds a personal touch that means the world this time of year. So, grab the materials below and follow our step-by-step guide to make a DIY Christmas card!

What you’ll need:


  1. 2 x A5 card (two different colours – we’ve used red and white)
  2. Ruler
  3. Scissors
  4. Pencil
  5. Double-sided sticky tape or glue
  6. Bone folder (or you can use the side of the ruler or scissors)

Step 1: Mark the fold

Ready? Let’s get started! Take the white card and use the ruler to mark the middle of the card at the top and bottom with your pencil – this is where the fold will be. Now, do the same on the red card, so they’re both ready to be folded.

Step 2: Fold the card

Lay the red card flat and use the ruler to line up the top and bottom pencil marks. Then, run the bone folder down this line to make a crisp crease and fold the card. If you don’t have a bone folder, simply fold the card by lining up the edges and using your pencil marks as a guide. Repeat for the white card.

Step 3: Mark the tree

Grab your trusty ruler again and lay the white card flat, inside down. Measure approximately 3cm from the bottom of the card on each side and draw a straight line across the card with your pencil. Then, mark 6cm on either side of this line from the fold – this will be the bottom of your tree!

Step 4: Create the tree shape

Next, mark the top of the tree in the fold at the opposite end of the card (about 10cm above the line you just drew) and use the ruler to line this up with the 6cm marks you just made on the bottom line. Use the bone folder to create a crease on either side of the fold so you have a guide for the tree shape.

Step 5: Cut the tree

Lay the white card flat again, inside down, and measure 2cm up from the bottom line you’ve already created. Draw a line across the card and repeat four times to mark out your tree. Fold the white card again and start to cut along the lines until you hit the crease you just created. Repeat this for each line, getting shorter as you get closer to the top.[No text in field]

Step 6: Fold the tree

Now, for the fun part – bringing your tree to life! Take the bottom section of the tree and fold it the opposite way from the card (this is known as a reverse fold) to make it pop-out. Repeat for the middle and top sections, then fold the card back over as normal to make the creases sharp.

step 7: attach the cards

Finally, pop a few bits of double-sided sticky tape onto the inside of the red card (one in each corner will do) or use a glue stick and firmly press the white card onto it to attach. Once in place, fold the card again to define the crease and there you have it – your pop-up Christmas card is now complete!

Watch the full tutorial

Follow all the steps to make your own pop-up Christmas card in our video below!


Continue the festive fun

Our interactive advent calendar is packed full of fun Christmas crafts like this, as well as delicious recipes to try over the festive season. Join the countdown to Christmas and discover what awaits behind each door – and don’t forget to share your creations with #OldElPasoChristmas!