DIY Christmas Tree Piñata

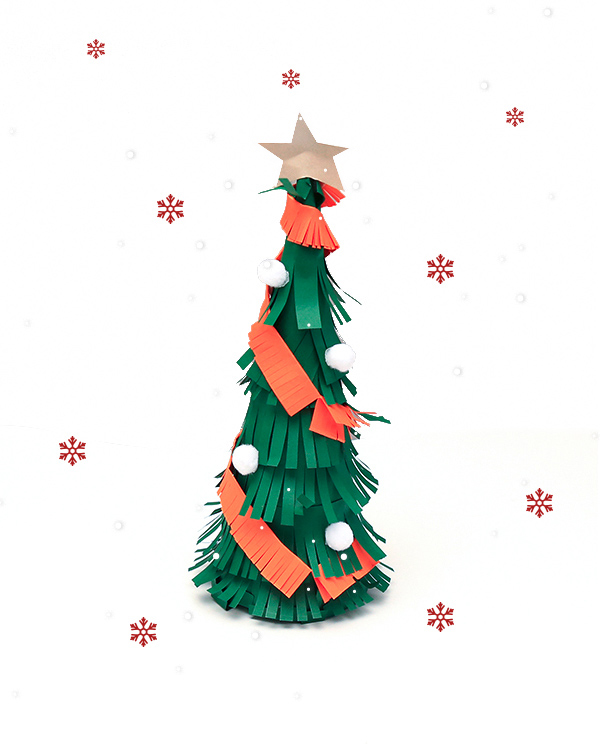
Add a little Mexican-inspired flare to the festivities with our DIY Christmas tree piñata! The perfect party game for the whole family, customise yours with everyone’s favourite sweets or opt for some surprises… Whichever you choose, follow our simple steps below to create your very own Christmas piñata. Did we mention they’re also great stocking fillers?
- 3 x A3 coloured paper (we’ve used green)
- 1 x A4 gold paper
- Tissue paper
- Double-sided sticky tape
- Glue stick
- Scissors
- Pencil
- Mini pom poms (or cotton balls)
- String
- Candy
Step 1: Make the cone
Take a sheet of green paper and roll it diagonally into a cone shape. Hold the narrow end of this in place and cut off the excess at the top to make a straight edge. Then, grab your double-sided sticky tape and place a strip underneath the folded end to seal the cone shut.
Step 2: Cut the fringes
Carefully cut long strips from another piece of green paper – you’ll need 7-10 of these depending on the size of your cone. Then, take each strip in turn and cut small fringes along it, before fanning these out slightly.
Step 3: Attach the fringes
Once you’ve cut all your fringes, apply a long strip of double-sided sticky tape to the back of each and start to attach them to your cone. Start at the bottom and work your way up to the top, cutting off any excess (you can use these small strips for the top of the cone). Be sure to fan out the fringes as you go, so it starts to look like a tree!
Step 4: Make the base
Place your cone onto the final sheet of green paper and draw round the end with your pencil. Set your cone aside and cut out the circle you’ve just drawn. Double-check it definitely covers the end of the cone, before cutting fringes along the edges.
Step 5: Fill the piñata
Now, the part you’ve been waiting for! Tip your cone upside down and fill it with your choice of candy, sweets, chocolates or goodies – just make sure they’re not too heavy. Then, apply a generous helping of glue to the fringes of the circle you just made and attach it to the bottom of the cone, bending the fringes to secure them in place.
Step 6: Decorate the piñata
Trace two stars onto the gold paper and carefully cut them out. Glue each star together, leaving a small gap at the bottom, and attach to the top of the tree. For tinsel, cut fringes into a couple of strips of tissue paper and wrap around the tree, and finish with some mini pom poms for baubles.
Step 7: Hang up the piñata
Finally, securely tie some string to the top of the tree, ensuring the ends are long enough to hang up the piñata (be sure to hang it up somewhere there’s enough room to swing). Now, all that’s left to do is grab your stick and get the party started!
Watch the full tutorial
Follow all the steps to make your own Christmas tree piñata in our video below!
Continue the festive fun
Our interactive advent calendar is packed full of fun Christmas crafts like this, as well as delicious recipes to try over the festive season. Join the countdown to Christmas and discover what awaits behind each door – and don’t forget to share your creations with #OldElPasoChristmas!